I recently installed Proxmox in my homelab and wanted to use Let’s encrypt certificates for my nodes. I have my domain registered at Loopia a Swedish webhosting company. When using their DNS services it’s possible to create an API user for the ACME client to automate the DNS challenge. This is needed to prove that you own the domain.
First log in to Loopia customer portal and create a subdomain that your proxmox node will use. In my case it’s pve.homelab.domain.com. No need to create a associated A record. That should be handled by your internal DNS.
Next step is to create a API user and assign appropriate permissions.
It needs to have the following permissions:
addZoneRecord
getZoneRecords
removeZoneRecord
removeSubdomain
Next step is to configure proxmox. Log in and locate ACME under datacenter. Click add under challenge plugins. Enter your Loopia API user in following format. LOOPIA_User = proxmoxlab@loopiaapi LOOPIA_Password = secretpassword
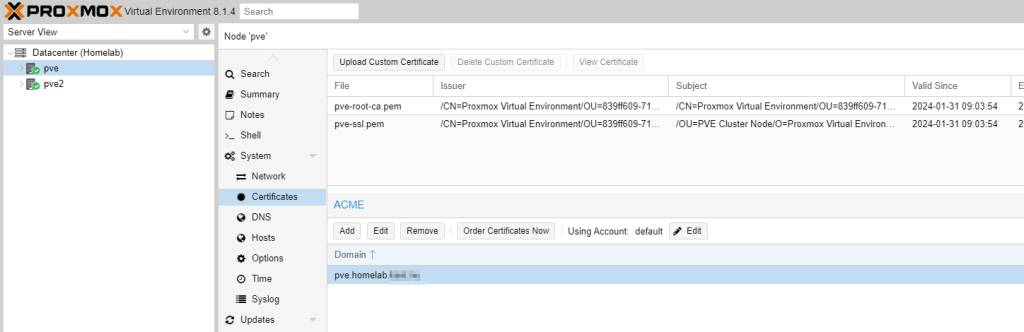
Select the node you are creating a certificate for. Under certificates and ACME click add. Set DNS as challenge type. Plugin should be the one created in previously step. And as domain pve.homelab.domain.com
The default Let’s encrypt account is configured for the staging environment. This could be used for testing. Create a new account for Let’s Encrypt V2 directory.
The final step is to press order certificate and wait for the validation. Make sure to select the production account.
I want to use a free SSL certificate from Let’s encrypt to secure my Azure resources. For example an application behind a Application gateway. I will use a key vault to store my certificate. Beside azurerm Terraform provider vancluever/acme is also used. For documentation visit https://registry.terraform.io/providers/vancluever/acme/latest/docs
Point the domain or subdomain to your Azure DNS zone at your domain registrator. In this example Cloudflare is used.
Values for name servers are found on DNS zone overview page to the right.
Before proceeding make sure that your user have permissions to create certificates in the key vault. For RBAC this can be handled direct on the resource or by inheritance. The server URL is this example is for the staging environment used for testing your code before applying for a production certificate. Read more at https://letsencrypt.org/docs/staging-environment/
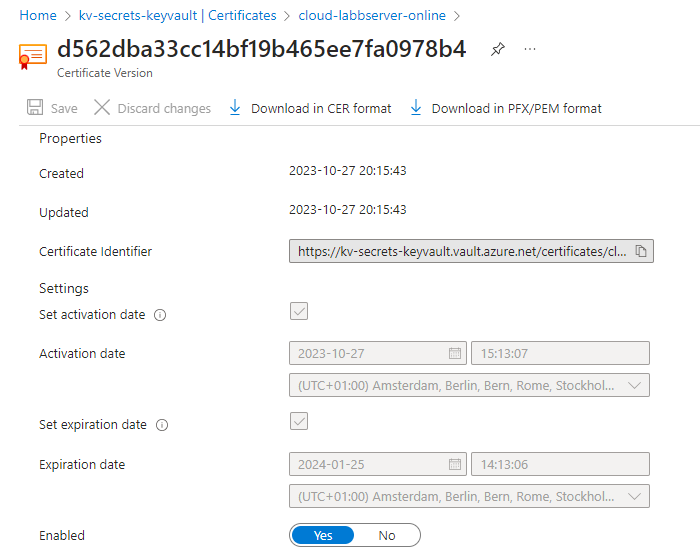
As we can se we now have a certificate in our key vault and can see expiration date and have the possibility to download it to our local disk in different formats. If used in Azure it’s best to load it directly from the key vault to make it easier to automate renewals.
I have worked a lot with AD during the past years mostly with powershell. This time I needed to create a AD computer object with terraform and started to look into how to setup terraform AD provider.
First you need to configure the provider. I am running terraform on my non domain joined laptop. Terraform needs winrm access to a domain joined server with Active directory powershell modules installed. It’s important to use capital letters in all FQDNs for kerberos to work both in provider.tf and krb5.conf.
Now the provider should be configured and ready to use. Next step is to create a AD computer object in main.tf.
resource "ad_computer" "c" {
  name        = "test01"
  container   = "OU=Servers,OU=Stockholm,OU=SWE,DC=homelab,DC=domain,DC=com"
  description = "My TF AD object"
}
To test the code run terraform apply -var aduser=adadmin -var adpassword=secretpw123 and wait for output.and type yes if everything seems fine.
Now we have a new computer object in AD managed with terraform.
Next thing I wanted to test was a bit more complex. I wanted to create a OU structure with several sub OUs for each office. In powershell you can solve it with a nested foreach loop.
$sites = ("Malmo", "Ystad", "Karlstad")
$subOU = ("Servers","Computers","Groups","Users")

foreach ($site in $sites){
    New-ADOrganizationalUnit -Name $site -Description "My office in $($site)" -Path "OU=SWE,DC=homelab,DC=domain,DC=com"
    foreach ($ou in $subOU){
        New-ADOrganizationalUnit -Name $ou -Description "OU for $($ou)" -Path "OU=$($site),OU=SWE,DC=homelab,DC=domain,DC=com"
    }
}
In terraform we need to create two variables as lists. One containing each office and one with our sub OUs. We also use locals to combine them with the setproduct function.
variable "sites" {
  type = list
  default = ["Malmo", "Ystad", "Karlstad"]
}

variable "siteOUs" {
  type = list
  default = ["Servers", "Users", "Groups", "Computers"]
}

locals {
  ous = setproduct(var.sites, var.siteOUs)
}
In order to get this to work we first need to create all Office OUs with for_each and our variable sites. For all sub OUs we use our locals named ous as a source and loops trough all combinations that we created with setproduct. We pick the name from the second array and a part of the path from the first array containing office names. Note that we make sure all office OUs are created first with depends_on.
resource "ad_ou" "ou" {
  for_each = toset(var.sites)
    name = each.value
    path = "OU=SWE,DC=homelab,DC=domain,DC=com"
    description = "OU for ${each.value} Office"
    protected = false
}

resource "ad_ou" "o" {
  for_each = {
    for o in local.ous : "${o[0]}-${o[1]}" => {
      name = o[1]
      path = "OU=${o[0]},OU=SWE,DC=homelab,DC=domain,DC=com"
      description = "OU for ${o[1]} in ${o[0]} Office"
    }

  }
  name        = each.value.name
  path        = each.value.path
  description = each.value.description
  protected   = false

    depends_on = [
    ad_ou.ou
  ]
}
This is the final result i AD console. I learned a lot while figure out how to solve this in terraform.
A runbook can help you to run scripts on a schedule or trigger them with a webhook. You can either run them in Azure or on your on-premises server. This example will show how to run a script on a on-premises that is connected to Azure Arc.
First step is to create an automation account in your favorite region. You might need to create a resource group as well.
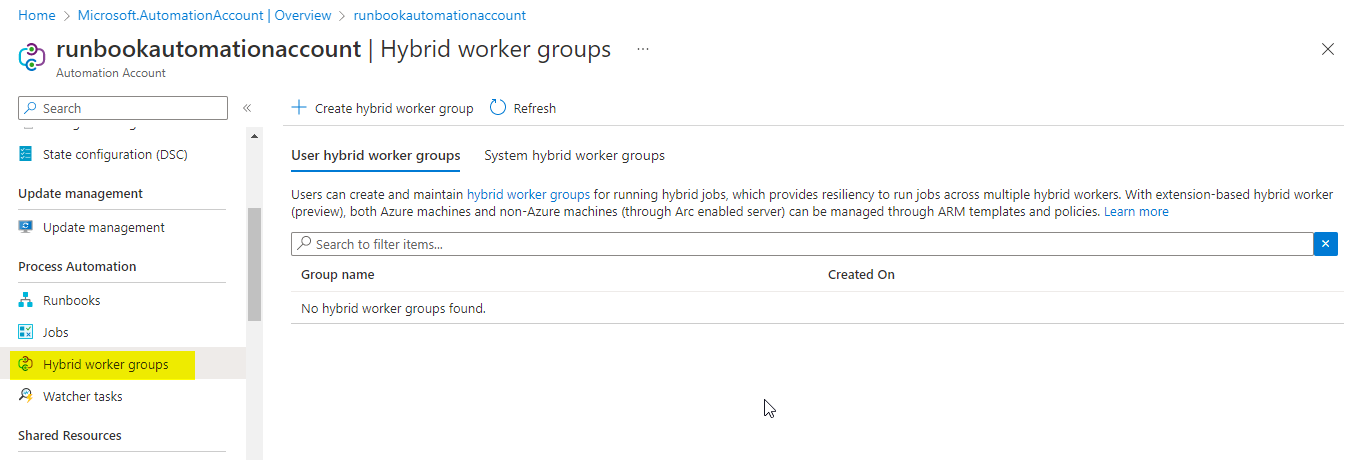
Go to your newly created automation account and look for Hybrid worker groups.
Create a new hybrid worker group and select a name.
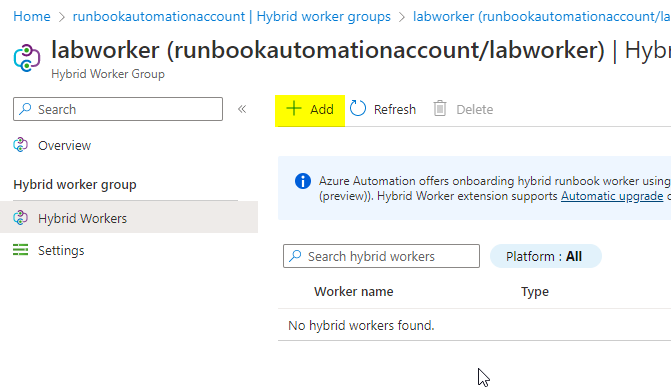
Now we have a Hybrid worker group without any hybrid workers. Click hybrid workers to the left
Click add
Select one or more servers and add them to your hybrid worker group. If your list is empty you need to enable Azure Arc at least on one server.
Back to automation account and press Runbooks.
Create a new runbook
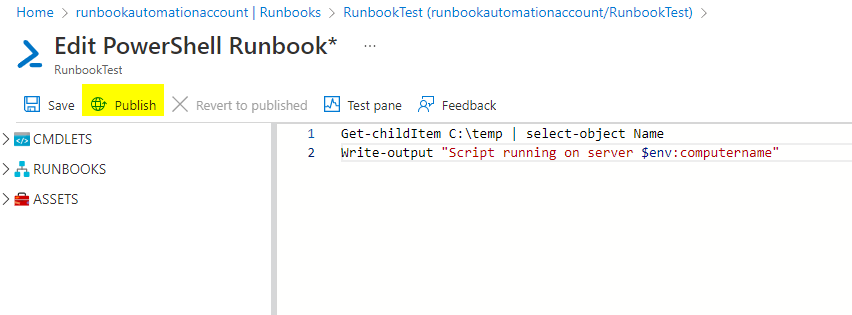
Give the runbook a name and select type. In this example Powershell och runtime version 5.1. Now to the fun part, edit the new runbook and write or paste your script. Select publish when done.
When pressing start a meny to the right enables you to select to start the runbook and let it run on a server in your hybrid worker group.
When the runbook is finished we can view the output or errors. The last line shows the name of the server the script was executed on. Can be useful for troubleshooting if the hybrid worker group contains multiple servers.
To make more use of this capability ro trigger script on a local server from Azure start explore schedules and webhooks.
Azure Arc helps your manage your on-prem servers from Azure portal. To add a server to Azure Arc just search for “Servers – Azure Arc” in the portal and press Add.
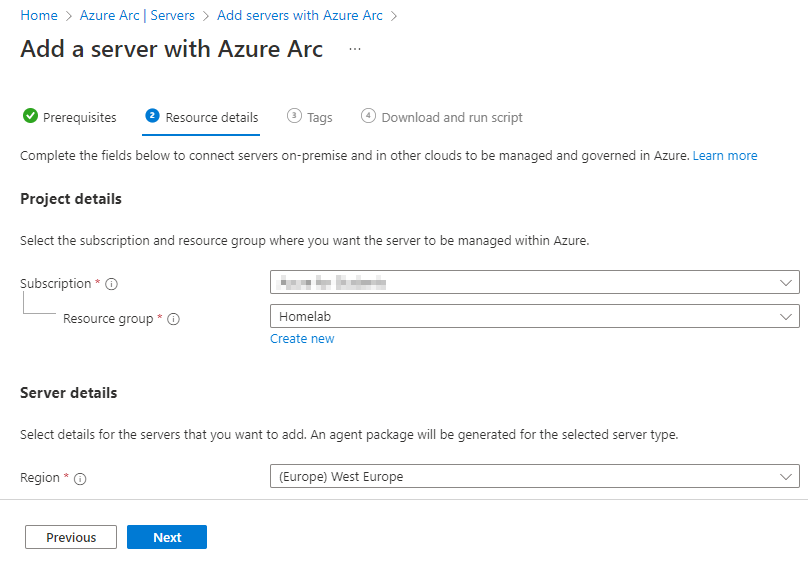
This time we will only add one server and can select Generate Script option.
Select your subscription and a new or existing resource group. You also need to select a location.
In this step you can add your desired tags.
The script is ready to be downloaded or copied to your server.
Start powershell as local admin and navigate to the folder where your onbording script is stored.
The script will download and install Azure machine agent and open a web browser where you need to sign in to Azure.
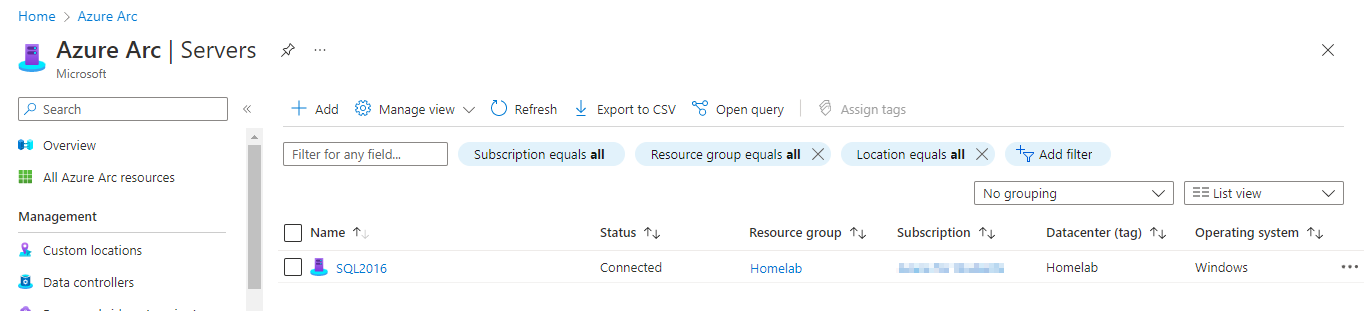
After a couple of minutes our on-prem server is visible in Azure portal.
We can now see some details like operating system and the tags we defined during setup. In a future post I will show what we can achieve with Azure Arc enabled servers.
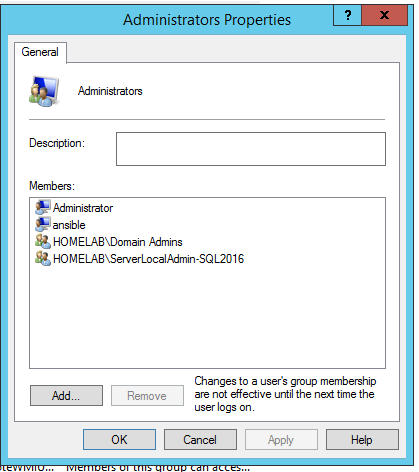
It’s common to use a Group policy preference to push a AD group to local admin group on a server or client. But something that you might not know is that you can use a variable in the group name to make it a bit more dynamic. With this setup you only need to create the GPO and one AD group per server. No need to logon or use a Powershell script to target each server and and add a group in to det local Administrators group.
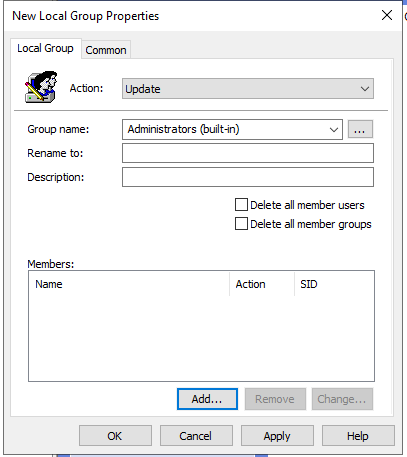
First create an empty GPO and link it to an OU containing your servers you want to target. Then edit your new GPO and go to Computer configuration -> Preferences -> Local Users and Groups andright click on the white area to the right and select New -> Local Group
Set action to update and Administrators (built-in) as group name. Then press Add… under members.
As a member name add your desired group name for server admin groups and end it with the variable %computername%. In my lab environment the group name is homelab\SeverLocalAdmin-%computername%. My AD domain is called homelab.
Next part is to create a AD group following your naming convention and add the computer name at the end. My server I want to test this on is called SQL2016 so the group name is ServerLocalAdmin-SQL2016.
Next step is to verify the result of the GPO. First log in on your server and then run gpupdate /force.
Open Computer Management to verify the members in the local admin group.
In order to populate phpIPAM I needed to export all subnets that was already present in Meraki Dashboard without type all information manually. I found PSMeraki module on Github which is a prerequisite for this script. The script creates a CSV that can be importet in to phpIPAM
I needed to get a list of people in som AD group for an audit so I wrote a quick script to export each group matching my filter to a CSV-file and populate it with name and samaccountname. Setting semi colon as an delimiter ensures that you can open the CSV-file in Excel with no additional work to get columns correct.
Make sure to set you hostname and check in your file in a Git repository.
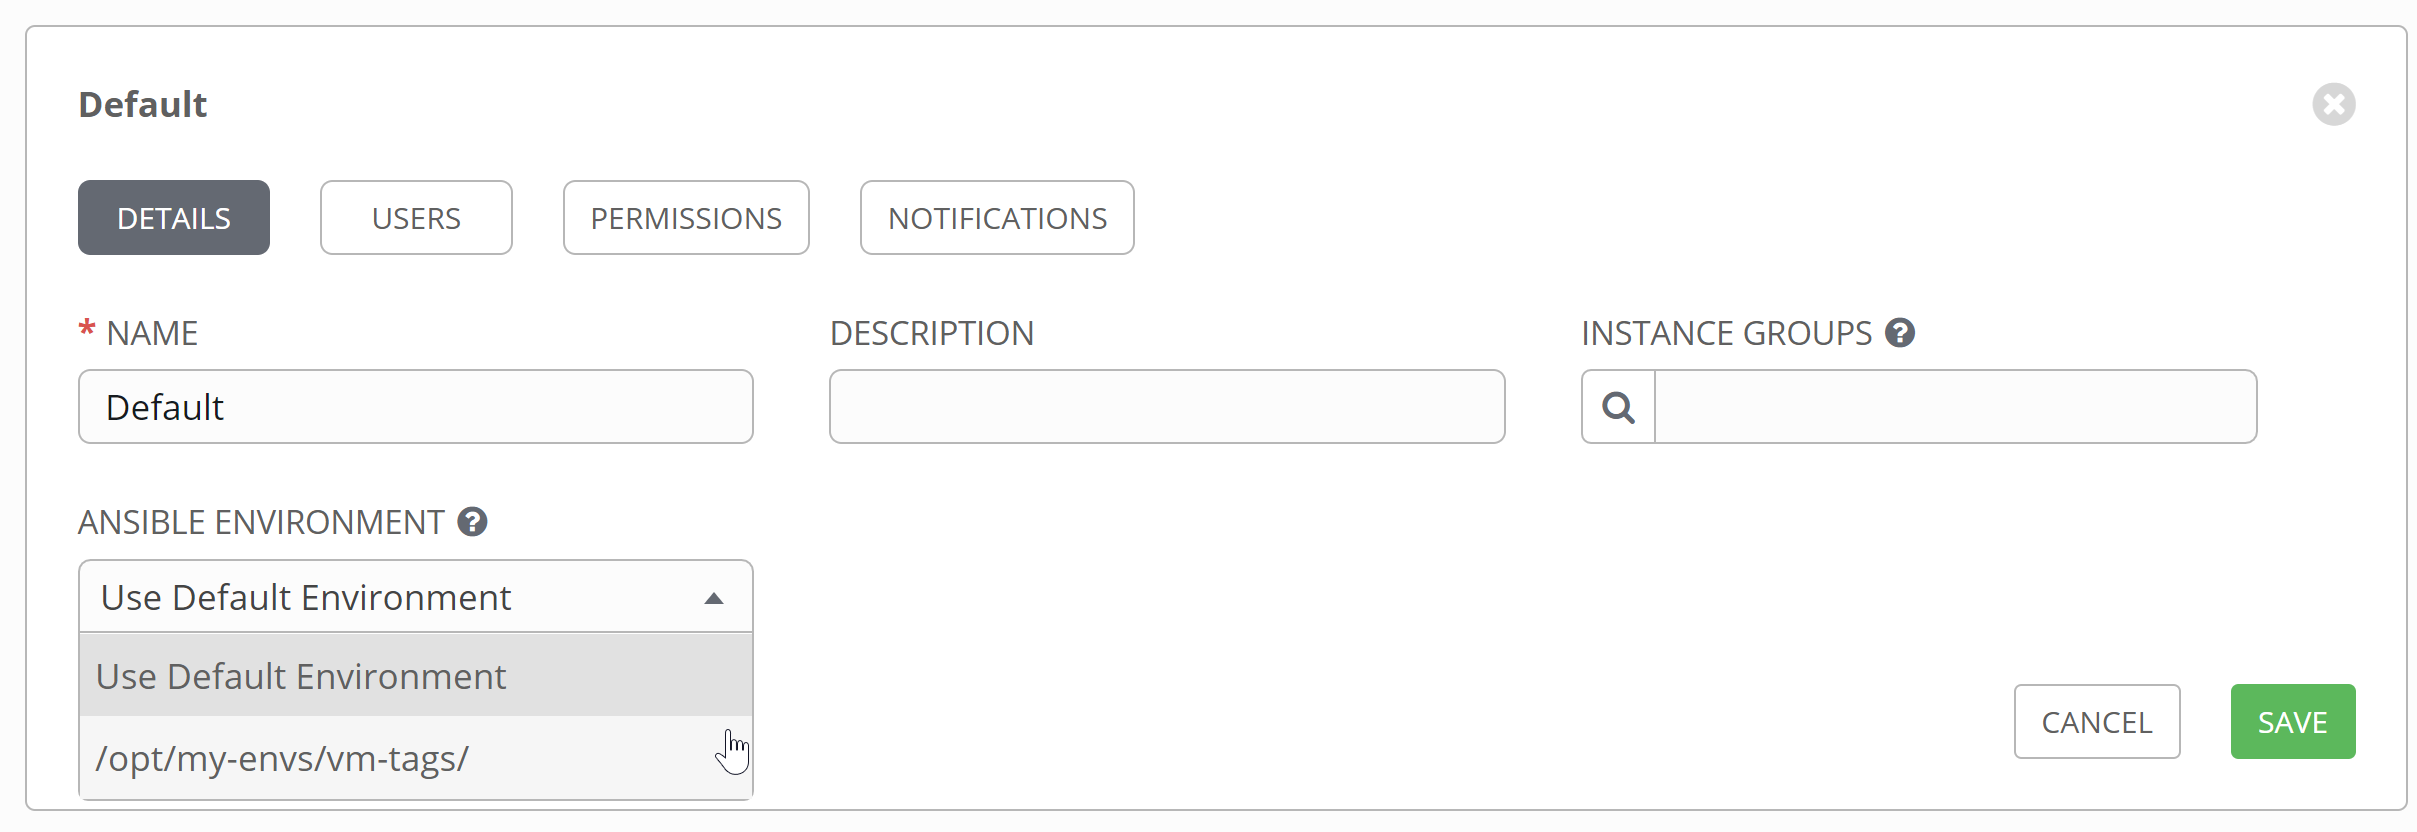
Create a project, my is called Inventory an select Git as SCCM Type. Add you Git repository URL as SCM URL. Don´t forget to create SCM credentials if you haven’t done that already. Set /opt/my-envs/vm-tags as Ansible environment.
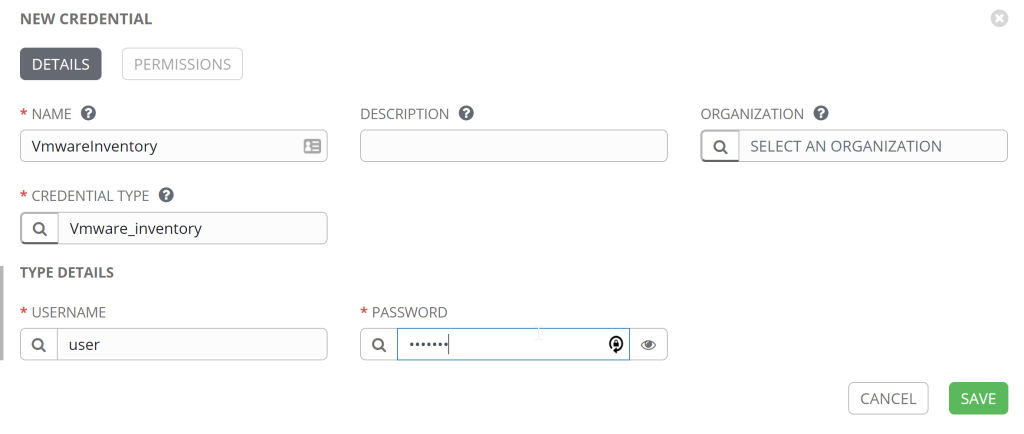
Next step is to create a custom credential type. I called my Vmware_Inventory
Create a new credential with your new credential type. You will need a user with read permissions in your Vcenter server.
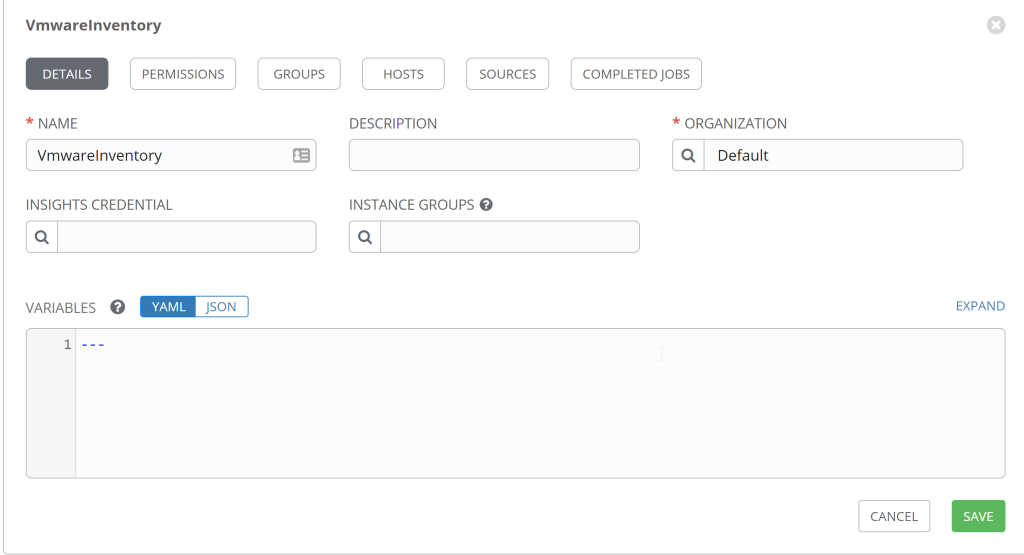
Go to Inventory and create a new Inventory and give a name and hit Save.
Click sources and create a new source. Give it a name and select Sourced from a project as a sources. Set /opt/my-ens/vm-tags/ as ansible environment. Search for and select for your credential with read permission in Vcenter.
Now you should be able to sync your new inventory.
After the sync has finished you should see your hosts and groups.
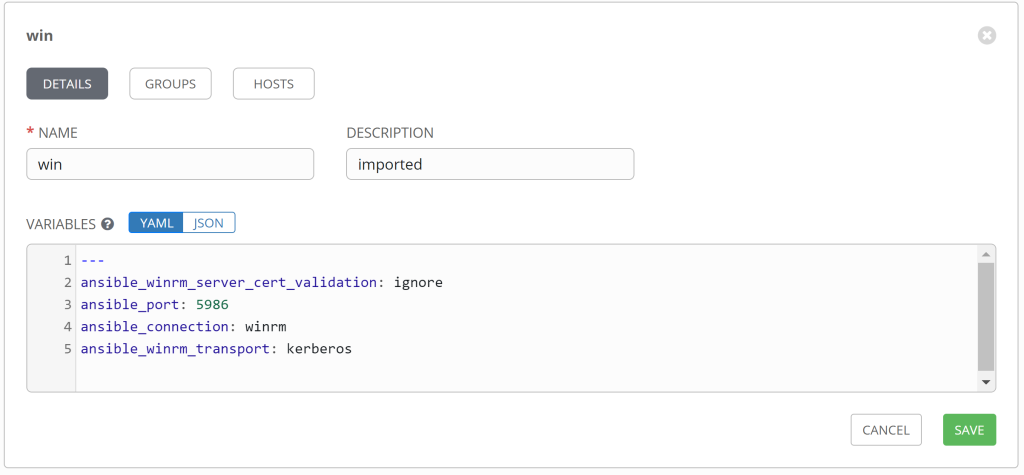
For example I have connection details as a group variable on my group win. All my windows server are in the group win. I needed you cand have second group like SQL servers and then add that group to win group to allow it to inherit all win group variables.
New to AWX and I had a goal to setup Vcenter as an inventory source with groups based on vmware tags. I got that setup working with ansible and started to investigate how to achieve same result in AWX. After a couple of days testing I got some hints on Reddit and was able to get it working as expected. Hopefully this guide can help someone (and me next time) setup inventory with tags.
First step if not already done is to install AWX. I will not cover the setup. It is already covered here https://github.com/ansible/awx/blob/devel/INSTALL.md. I have chosen to install on a standalone Docker host in my Home lab running CentOS.
Open the inventory file install/inventory in your favorite editor. Look for and uncomment custom_venv_dir=/opt/my-envs/ Create dir: mkdir /opt/my-envs
Run the playbook: ansible-playbook install.yml -i inventory
Create folder and Python env and install all prerequisites
Log on to AWX and navigate to Settings -> System. Add /opt/my-envs/vm-tags to CUSTOM VIRTUAL ENVIRONMENT PATHS
Last step in this part is to verify our new custom env. Go to ORGANIZATIONS and push then pencil to edit default organization. Verify that you can see your new Ansible Environment.